
Zabbix is able to receive SNMP traps sent by hosts for immediate alerting rather than waiting for a poll of the host to find the issue.
Not all Ubuntu distributions come with the the require SNMP packages installed so install them if needed and enable them at boot.
sudo apt install snmp snmptrapdNext we need to start Zabbix’s trapper service and tell it where to collect the trapped messages from.
sudo nano /etc/zabbix/zabbix_server.confSet the value from StartSNMPTrapper to 1 and set the file path to the the file you want to read the traps from by adding these lines to the config file. Remember the log file path you are using as you need it for configuration later.
SNMPTrapperFile=/var/log/zabbix/snmptraps/snmptraps.log
StartSNMPTrapper=1
Ensure you have created the folder and chown the file and folder(s) to zabbix:zabbix so the process can write to the file.
mkdir /var/log/zabbix/snmptraps
touch /var/log/zabbix/snmptraps/snmptraps.log
chown -R zabbix:zabbix /var/log/zabbix/snmptraps
chmod 666 /var/log/zabbix/snmptraps/snmptraps.lo
Restart the Zabbix service to apply the new configuration.
service zabbix-server restartThe SNMP Trapper service uses a script to format and save the data it receives into your log file which can be downloaded direct from Zabbix.
curl -o /usr/sbin/zabbix_trap_handler.sh https://raw.githubusercontent.com/zabbix/zabbix-docker/6.4/Dockerfiles/snmptraps/alpine/conf/usr/sbin/zabbix_trap_handler.shEdit line 3 of the script to reflect the filepath to your chosen log file, which you set in the config file earlier.
nano /usr/sbin/zabbix_trap_handler.shWe now need the SNMP Trapper service to use this script as the default action to a trap being received, and as we are using SNMPv2, we need to tell it what community string to expect. In this example the community string is CT-RADIUS-SNMP so edit it to you requirement.
nano /etc/snmp/snmptrapd.confAdd these two lines to the end of the file and save.
traphandle default /bin/bash /usr/sbin/zabbix_trap_handler.sh
authCommunity log,execute,net CT-RADIUS-SNMP
Now we can enable the snmptrapd service and restart it to load the new config.
systemctl enable snmptrapd
service snmptrapd restart
To test the configuration, you can manually send SNMP. From Terminal on a Mac the command is below, which will need editing to reflect the IP address of your Zabbix server and your community string.
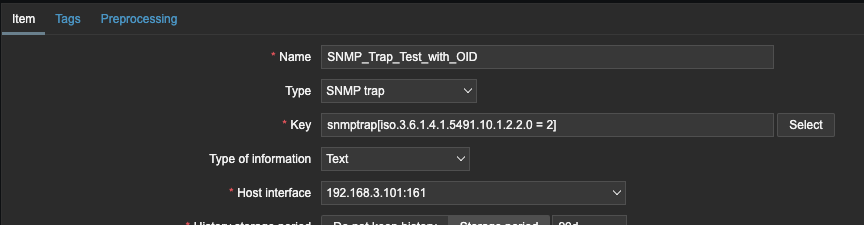
snmptrap -v 2c -c CT-RADIUS-SNMP 192.168.3.30 0 .1.3.6.1.4.1.5491.10.1.2.2.0Zabbix uses the IP address of the host to filter the log file and regular expressions to filter the traps it receives. Create a host in Zabbix and an item as shown. In the example we are expecting the message to contain iso.3.6.1.4.1.5491.10.1.2.2.0 which we can use to manually test the trap in a moment.
You can now check the trap has been received and logged in the correct file by opening your log file.
more /var/log/zabbix/snmptraps/snmptrap.log
Zabbix uses the Host key as a regular expression filter; if it finds the string within the square brackets in the last log entry for the that host, it will return the whole log entry. It’s up to you and the clever use of this filter (and maybe Preprocessing) to create the item and trigger you need.
In the example below the item will update if an entry in your snmptrap.log file contains the regular expression iso.3.6.1.2.1.2.2.1.8.55 = 2
In this example the item will update if an entry in the snmptrap.log file contains the regular expression iso.3.6.1.2.1.2.2.1.8.55 = 2
When this regular expression was found, the value of the item became:
20240222.163839 ZBXTRAP 192.168.3.101
UDP: [192.168.3.101]:161->[192.168.3.30]:162
iso.3.6.1.2.1.1.3.0 = 45:8:04:19.38
iso.3.6.1.6.3.1.1.4.1.0 = iso.3.6.1.6.3.1.1.5.3
iso.3.6.1.2.1.2.2.1.1.55 = 55
iso.3.6.1.2.1.2.2.1.7.55 = 1
iso.3.6.1.2.1.2.2.1.8.55 = 2
This is because the last line of this entry matches the expression. In this case we aren’t bothered by the other OIDs that also changed, just that iso.3.6.1.2.1.2.2.1.8.55 became a value of 2.

To set a trigger against this item, we can use the Change() function. The timestamp in the first line of the log entry will always change, so if the regular expression is found, even if the rest of the log entry looks the same, the timestamp will still activate the trigger.
Leave a Reply
You must be logged in to post a comment.