To access RM You need to be on the FOG Network. If RM has just been installed, you’ll need to add the server address “rm2.ct-networks.com” and port “443”.
The main screen lists every DP radio enrolled on RM. If this is a fresh install it’s a good idea to re organise the columns and put the “serial number”, “Radio ID”, “Radio alias”, and “Configuration” on the far left of the screen. The Radio ID matches the 3-digit number on the radio and it is vital that these numbers don’t change.

Radio files are called “Configurations” in RM. To select a configuration simply highlight a line. You can highlight multiple radios by holding the ctrl button whilst left clicking the triangle on the left-hand side of the screen. Then right click and select “Select configuration”. If the configuration has already been built, please select it in the next window and select ok. If you select in incompatible configuration then a red box will appear around configuration box. If you need to make a new configuration then please read below.
If you need to make a new configuration then there are two ways to do this. You could copy an existing configuration by right clicking the configuration you wish to copy and selecting “Copy configuration”. The other way to generate a configuration is by scheduling a read job with the “Generate configuration” check box enabled. Once the configuration has been generated you edit it in the same way as any digital Motorola file.
To schedule a job first you select the radios that need programming and then either select the clock icon in the top left corner or right click and select “Select job”. In the “Schedule Job” window you’ll see the following options.
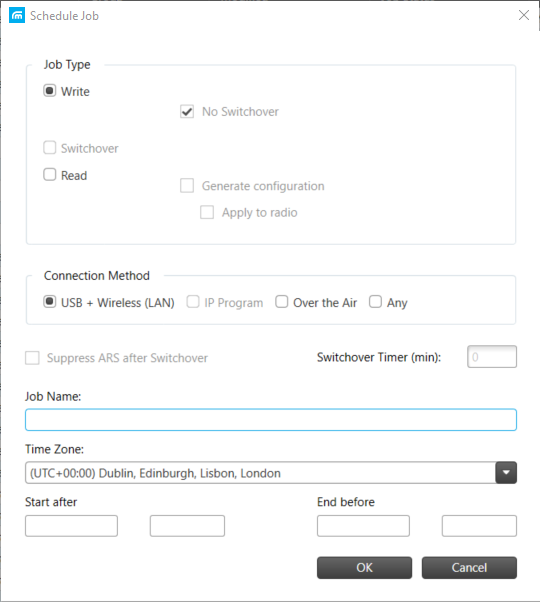
Write: Sends configuration data to radio handsets.
No Switchover: Postpones the activation of the new configuration until a Switchover command is sent.
Switchover: Allows a previously deployed configuration to be activated.
Read: Reads the radios configuration data.
Generate Configuration: Generates a configuration from the read radio. The configuration name will be the radios s/n.
USB Wireless (LAN): USB & WiFi programming.
IP Program: Don’t use this.
Over the Air: OTAP over 400MHz.
Job Name: Useful for identifying what radios are on what job. If this field left blank then the job date & time will be displayed instead.
When the job starts you may see the following messages:
Running: Processing job: The job is being processed by the Job Processer and will write/read the radio once built.
Running: Waiting for Job Processor: The job processer can only process so many radios at one time. The job processer will
Running: Waiting for Device: The device programmer is waiting to see the radio before programming can start.
Failed: The job has failed for some reason. Check the tasks tab to find out why before retrying the job as a configuration change may be required.
Leave a Reply
You must be logged in to post a comment.