As an example, I am going to set up a Panasonic AK-UCU500 CCU with UC3000 head.
A UE70 PTZ and two HRP100 ROP’S
First, we need to plug our CCU, PTZ, ROP’s, and a setup laptop/PC into a POE+ network switch, then set the IP addresses for everything. I will use the following IP addresses.
CCU = 192.168.0.11
PTZ = 192.168.0.12
ROP 1 = 192.168.0.21
ROP 2 = 192.168.0.22
SET UP PC = 192.168.0.50
So first, the CCU.
Goto the maintenance menu then the network menu and change the IP address.
HTTP PORT should be left at port 80., the OP PORT should be left as port 49152.
Next, set up the IP address on the PTZ.
So, download the easy IP software from the Panasonic website.
Run the software and it will show you all the CCU’S, ROP’s and PTZ’s that are on the network.
Double click on the PTZ and it will open a web browser which will give you access to the PTZ setup menu.
Goto the setup tab then Enter:
Username: admin
Password: 12345
(these are the Panasonic Defaults)

Then go to the network tab and set the IP address. Scroll down and press the set button.
You can type the new IP address into your web browser to check it has changed and the camera set up page should pop up.
Next, we need to set the IP addresses on our two ROP panels.
So, on the ROP go to menu page 36 ROP IP SETTING.
Then change the IP address and press upload.
If you get an IP duplicate error message, then you need to go to page 37 CAMERA IP SETTING
In here you will find that you can set up the IP addresses for up to 100 Camera’s.
Regardless of weather or not these IP addresses are being used they will cause an IP conflict with other Panasonic kit. So, you will need to go through all these cameras and make sure the IP addresses do not clash with any other kit on your network. I suggest moving them onto a different range if they are not being used.
Now all the equipment should be set up with suitable IP addresses for your network.
You can configure the ROP’s manually to target each camera over the network. But you will probably find it easier to use the HRP1000TOOL setup software to configure everything for you.
So first download the software.

Load up the ROP1000 tool. Then go to the ROP list tab and enter the IP address for the first ROP.

Now press the register button at the bottom.
Then press the network search button and the list should populate with all your ROP’s.

Change the ROP number as required and press the register button to register any changes.
The connection check box should make the tally box on your ROP flash to help identify it if needed.
Now go to the camera List tab and hit network search this should find all the camera’s or CCUs.

Now use the swap camera option on the right to set each of your cameras to its allocated camera number.

Select the ROP in the top left option box labelled (HRP1(192.168.0.21) then hit set.
This will push the config for all the Camera’s into the ROP.
Now change the top box to your second ROP HRP2(192.168.0.22) and hit set again.
This will push your config into the 2nd ROP. Repeat for all the ROPs you may have on your network.
Once this is done, your ROP’s should be happily working but are probably all currently set to control camera 1.
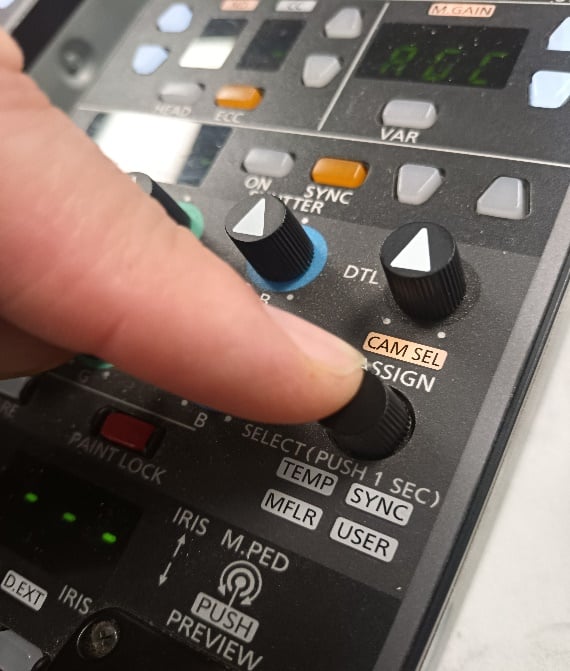
So, on each ROP, hold down the multifunction digital encoder until the light flashes orange and change its mode to Cam select. Then select the camera number that you want it to control.
Now on the Panasonic PTZ camera’s there are a couple of things to change before you can shade them.
Go into the camera menu and change the scene from full auto to manual1.
Then go to the picture menu and change the white balance mode to AWB. This will give you full control from your ROP.
Finally, go to the PTZ’s system menu. Then the others menu.
Now change the preset scope option to mode C.
Mode A adds iris and colour temp to each preset store which can mess you up if you are shading them manually. Any presets that get recalled will alter the iris and white balance to whatever was stored. Class B will save PTZ position and iris. Class C will only save PTZ position, zoom and focus. Not iris or colour temp. So, this is the best option for retaining all your settings with the ROP.
Leave a Reply
You must be logged in to post a comment.